Connect SAP and SST via SNC for SAP Application Data Source Connections
This section details the steps to configure a Secure Network Communications (SNC) connection between a Syniti Stewardship Tier (SST) Server installed on Windows and an SAP ECC 6.0 server.
The SAP side of the configuration is typically the responsibility of the SAP basis team. The steps for configuring different versions of SAP may differ so the steps below are intended for guidance only.
NOTE: The SAP server must have SNC enabled.
This topic contains the following sections:
Configure Settings for SNC Connection from SST to SAP
This section contains the following topics:
Download and Extract the Files
To download and extract the files:
-
Retrieve the SAP Cryptographic Library files. The latest version can be downloaded from the SAP Marketplace. These files are included in the download:
-
SAPCAR.EXE—Utility to uncompress .SAR files
-
SAPCRYPTOLIBP_<version number>.SAR—Compressed file with the SAP crypto library, for example SAPCRYPTOLIBP_8536-20011729.SAR.
-
-
On the SST Application server, create a folder for the Cryptographic Library, for example C:\SAP_SNC.
-
Copy the files downloaded in step 1 to this folder.
-
Extract the files from the .SAR file by executing the SAPCAR application. Open a command prompt with Administrator privileges.
-
Move to the C:\SAP_SNC folder and run the following command:
sapcar -xvf SAPCRYPTOLIBP_8536-20011729.sar
NOTE: Eight files are extracted, including the sapcrypto.dll and sapgenpse.exe.
Add SST System Environment Variables
You must be an Administrator on the SST server to perform this action.
To add the environment variables:
-
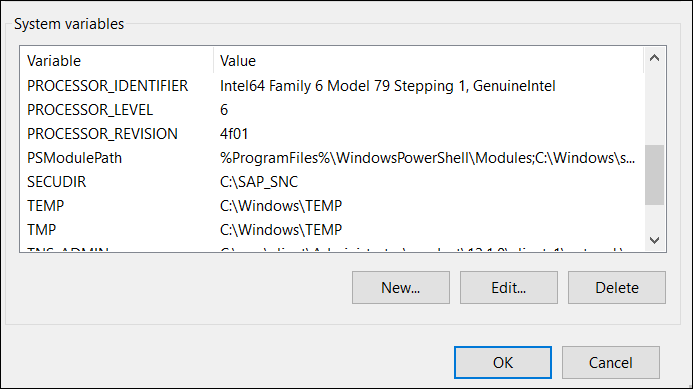
Add a System environment variable named SECUDIR with a value of the folder path where the SAP Cryptographic Library files have been extracted. The screenshot below shows an example where the files were extracted to C:\SAP_SNC.
-
Add another System environment variable named SYNITI_SNC_LIB with a value of the SAP Cryptographic Library full path, for example C:\SAP_SNC\sapcrypto.dll..
NOTE: When the SAP Front end tools with the cryptographic module are installed, environment variable SNC_LIB is automatically created with the associated Cryptographic Library path populated in the variable. If the SYNITI_SNC_LIB environment variable is not set up, the SST uses the library specified by the SNC_LIB variable.
-
If the IIS server or the Cransoft Service(s) were active during the creation of the SNC_LIB environment variables, restart them to read the newly created variables.
NOTE: A restart is not required if this is a baseline image.
Generate the Personal Security Environment and Certificate
Updates are required in the Stewardship Tier (SST) to enable SAP Application Data Source Connections to connect to the SST via Secure Network Communications (SNC). As a prerequisite to making these updates, the SST application server must have a Personal Security Environment (PSE) with a certificate accepted by the SAP server.
To generate the PSE and the certificate:
-
At the command prompt, run the following command to generate the PSE on the SST server:
sapgenpse gen_pse -v -p C:\SAP_SNC\RFC.pse
NOTE: Replace C:\SAP_SNC\ in the above command with your file path if it is different.
-
The process prompts you for a PIN code. A password is not required. Either:
-
Do not enter a PIN and press the Enter key.
-
Enter a PIN, and note it as it will be needed again.
-
-
The process prompts ‘get_pse: Distinguished name of PSE owner’. Enter
CN=[ServerName]
where [ServerName] is a name to identify the SST server in SAP, for example CN=SST_Server.
NOTE: As a result of this command, an RFC.pse is created in the SECUDIR folder.
-
At the command prompt, run the following command to generate the SST server certificate:
sapgenpse export_own_cert -v -p C:\SAP_SNC\RFC.pse -o C:\SAP_SNC\RFC.crt
NOTE: Replace C:\SAP_SNC\ in the above command with your file path if it is different.
NOTE: As a result of this command, the RFC.crt certificate file is created.
Import the Certificate to the Server and Client PSEs
To continue setting up the SNC connection, import the certificate into the Server and the Client Personal Security Environments.
To import the certificate into the Server PSE:
-
Navigate to the SAP System the SST should connect to via SNC.
-
Open the STRUST transaction.
-
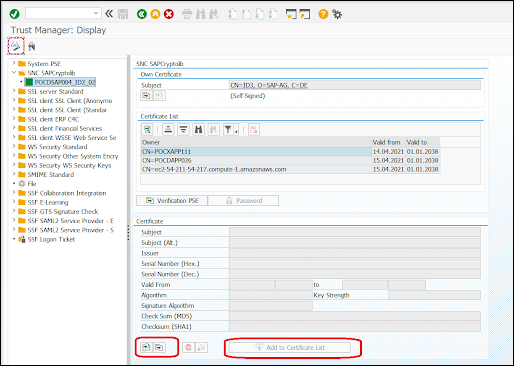
Expand the SAP_SNCCriptoLib folder in the left panel and click the node below it.
NOTE: You may be asked for a password to proceed.
-
Click the Import Certificate button which is left of the Add to Certificate List button; a pop up opens.
-
Select your certificate file RFC.crt and click the Continue button. The certificate data displays.
-
Click the Add to Certificate List button. The certificate displays in the Certificate List.
NOTE: If the Add to Certificate List button is disabled, click the Display <-> Change button in the upper left corner to review the settings
-
Click the Save button (Ctrl + S).
Next, import the Server Certificate to the Client PSE:
-
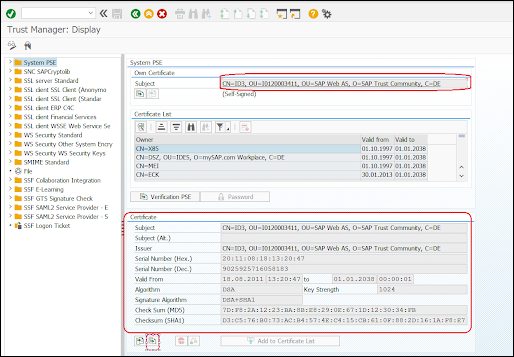
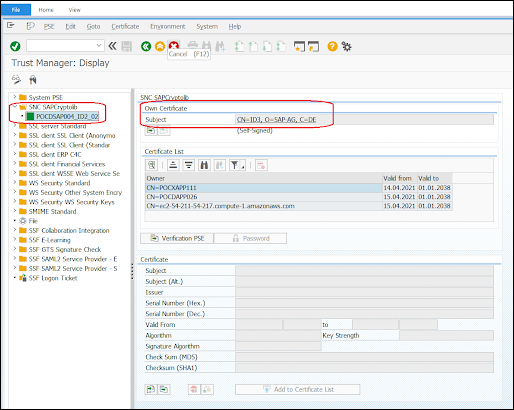
Still in the STRUST transaction on the SNC SAPCriptolib folder, double-click the Own Certificate Subject in the upper part of the screen, as shown in the screenshot below.
The Own Certificate data displays.
-
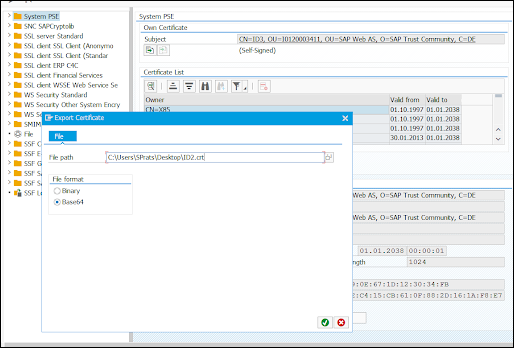
Click the Export Certificate button.
-
Assign a name to the exported certificate that identifies the SAP System where the certificate came from.
-
Select the Base64 option and click Continue (F8).
-
Open a command prompt, move to the SECUDIR folder, and execute the following commands:
sapgenpse maintain_pk -v -a <full path and name of certificate> -p <full path and name of environment>
For example:
sapgenpse maintain_pk -v -a C:\SAP_SNC\RQ1.crt -p C:\SAP_SNC\RFC.pse
A message similar to this one displays:
Adding new certificate from file "[YourCertificate]"
The certificate downloaded from SAP has been incorporated into your PSE environment.
Create the Credentials File
Using the scripts in this section, you can create the cred_v2 file that contains the credentials used in the SNC connections between SST and SAP. The cred_v2 file must be placed in the SECUDIR directory (to continue the example from above C:\SAP_SNC). The users that run the Cransoft Service and SST Application in the IIS server must have access to that system.
To generate the file and grant access to the users, the following command must be run from a command prompt with Administrator privileges:
sapgenpse seclogin -p RFC.pse -O <User>
The command must be run for each user that needs to have access. For example if the CranSoft service is run by the LocalAccount and the SST is run by the NetworkServices, the following commands should be executed:
sapgenpse seclogin -p C:\SAP_SNC\RFC.pse -O Administrator
sapgenpse seclogin -p C:\SAP_SNC\RFC.pse -O System
sapgenpse seclogin -p C:\SAP_SNC\RFC.pse -O NetworkService
Upon completion, this message displays:
Added SSO-credentials for PSE "<your path>/RFC.pse"
Enable SNC on SAP Application Data Source Connections
This section describes the updates required in the Stewardship Tier (SST) to enable SAP Application Data Source Connections to connect to the SST via Secure Network Communications (SNC). The SNC connection authenticates using the user credentials set on the
As a prerequisite for enabling SNC connections with an SAP server:
-
The SAP server must be configured to accept SNC connections
-
The SST server must have installed the SAPCrypto library
-
The Personal Security Environment must have a certificate accepted by the SAP server
Refer to the section Configure Settings for SNC Connection from SST to SAP for more information about these prerequisites.
Once the certificates have been set up on the SST Server, new fields must be populated in the Stewardship Tier to complete the SNC configuration.
To populate these fields:
-
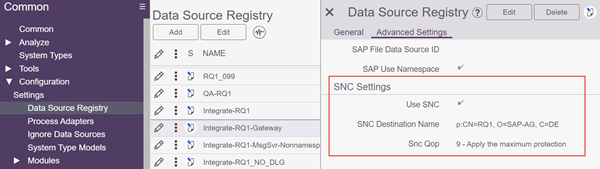
Select Common > Settings > Data Source Registry in the Navigation pane.
-
Click Vertical View for the data source to set the connection.
NOTE: This source must have an application data source type of SAP Application Server.
-
Click the Advanced Settings tab.
-
Click Edit.
-
Click the Use SNC check box to check it.
-
Enter p: followed by the name of the SAP certificate used to accept SNC connection in the SNC Destination Name field.
NOTE: Obtain this name by navigating to the STRUST transaction in SAP. The following screenshot shows where the Destination Name can be found inside the STRUST transaction. In the example from the screenshot below, the destination name entered in the SNC Destination Name field in the Stewardship Tier would be:
p:CN=ID3, O=SAP-AG, C=DE
-
Select the security level from the Snc Qop list box if needed.
NOTE: The Qop, or Quality of Protection, is the security level of the connection used in the communication with SAP. It is set to the highest level by default.
-
Click Save.
Once these fields are set up, the connections that use this Data Source Registry entry are made using the SNC protocol. These connections include testing the connection itself, connections used in Collect for RFC packages (BOA RFC, SAP RFC and SAPText) and connections used in Integrate.